Visual Studio Online Can't Push From Visual Studio Could Not Read Username
This browser is no longer supported.
Upgrade to Microsoft Edge to take advantage of the latest features, security updates, and technical support.
Azure DevOps Services | Azure DevOps Server 2020 | Azure DevOps Server 2019 | TFS 2018 - TFS 2015
Visual Studio 2019 | Visual Studio 2017 | Visual Studio 2015 | Visual Studio 2013
Share your Visual Studio solution with others by hosting your code in an Azure Repos Git repository. You can use Visual Studio to manage Azure Repos Git repositories or GitHub repositories. This article provides procedures for the following tasks:
- Add a project or solution to a local Git repository
- Publish your lawmaking to an Azure Repos Git repository or GitHub repository
- Review your code changes before publishing
- Link piece of work items to your commits
- Commit and push updates
- Pull changes from the master branch of your repository
To clone a GitHub repository, get the URL every bit described in Cloning a repository.
For an overview of the Git workflow, run into Azure Repos Git tutorial.
Prerequisites
-
Repos must exist enabled in your Azure DevOps project settings. If the Repos hub and associated pages don't display, encounter Turn an Azure DevOps service on or off to reenable Repos.
-
To view lawmaking in private projects, yous must exist a fellow member of an Azure DevOps project with Basic admission level or higher. For public projects, anybody can view the code.
-
If you don't take a projection, create one or sign up for free.
-
If you aren't a project member, get added.
-
-
To clone or contribute to code for a private project, you must be a member of the Contributors security group or accept the corresponding permissions set. For public projects, anyone can clone and contribute code. To acquire more than, see What is a public project?
Note
For public projects, users granted Stakeholder access have full access to Azure Repos.
-
Repos must be enabled in your Azure DevOps project settings. If the Repos hub and associated pages don't brandish, encounter Turn an Azure DevOps service on or off to reenable Repos.
-
To view code, you must be a member of the Azure DevOps project with Basic access or college. If you aren't a project fellow member, get added.
-
To clone or contribute to code, you must exist a fellow member of the Contributors security group, or have the respective permissions, in the project you desire to change.
-
To view code, you must be a fellow member of an Azure DevOps project with Basic access or higher. If you aren't a project fellow member, get added.
-
To clone or contribute to code, you lot must exist a member of the Contributors security group or accept the corresponding permissions.
To learn more near permissions and access, see Default Git repository and branch permissions and Nearly admission levels.
Note
Visual Studio 2019 version xvi.8 and subsequently versions provide a new Git menu for managing the Git workflow with less context switching than Squad Explorer. Procedures provided in this article nether the Visual Studio 2019 tab provide data for using the Git experience as well as Team Explorer. To learn more than, see Side-by-side comparing of Git and Team Explorer.
Add a project or solution to a new local Git repository
The first footstep to sharing your Visual Studio solution with others using Git is to create a local Git repo for your code. If it's your first time using Visual Studio to connect to Azure Repos, run across Connect to a project from Visual Studio for details.
- Visual Studio 2019
- Visual Studio 2017
- Visual Studio 2015.two
- Visual Studio 2013
- Git Command Line
-
Create a new local Git repo for your Visual Studio solution, by right-clicking the solution proper name in Solution Explorer, and and then selecting Create Git Repository. Or, choose Add together to Source Control on the status bar in the lower right-mitt corner of Visual Studio, and then select Git. If you don't encounter these options, then your code is already in a Git repo.
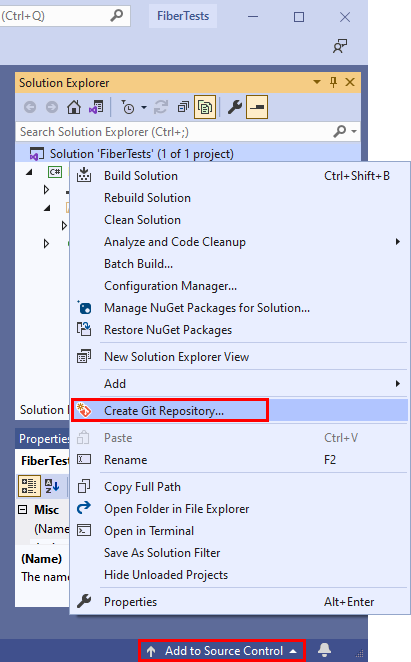
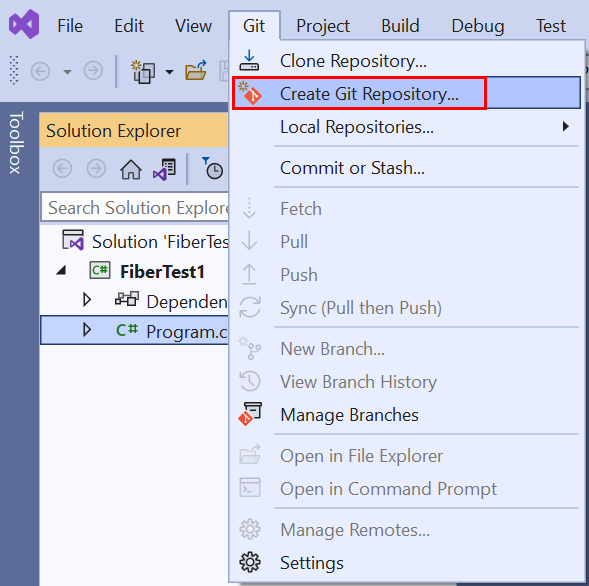
Or, cull Git > Create Git Repository from the menu bar to launch the Create a Git repository window. If you don't see this option, then your code is already in a Git repo.
-
This step merely applies to the Visual Studio Git version control feel: in the Create a Git repository window, cull Local only, verify the local path is correct, and then choose Create.
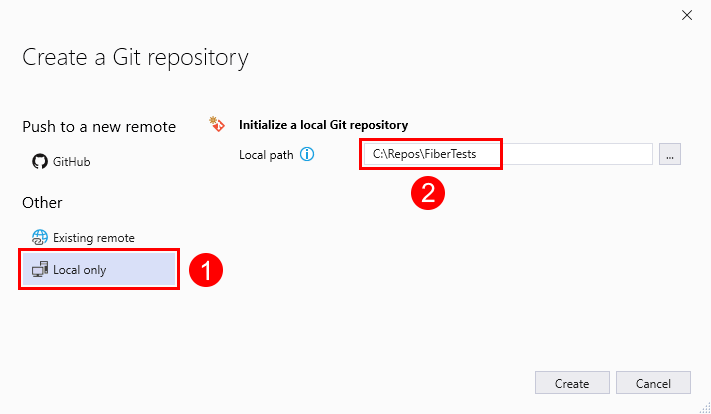
Team Explorer doesn't launch the Create a Git repository window, and assumes you desire a local Git repo.
You've at present created a local Git repo in the Visual Studio solution binder and committed your code into that repo. Your local Git repo contains both your Visual Studio solution and Git resources.

 on the status bar in the lower right-manus corner of Visual Studio. This will create a new repo in the folder the solution is in and commit your lawmaking into that repo. You can also right-click your solution in Solution Explorer and choose Add Solution to Source Control.
 or
or  , ensure that you have a project open that is office of a Git repo. If your projection is brand new or not all the same added to a repo, y'all can add together it to one by selecting
  on the status bar in the lower right-hand corner of Visual Studio. This will create a new repo in the folder the solution is in and commit your code into that repo.


Publish your code
You lot can share your work with others by publishing your local Git repo to an Azure Repos Git repo.
- Visual Studio 2019
- Visual Studio 2017
- Visual Studio 2015.2
- Visual Studio 2013
- Git Control Line
Visual Studio 2019 version 16.8 and afterwards versions provides a Git version control experience while maintaining the Team Explorer Git user interface. To use Team Explorer, uncheck Tools > Options > Preview Features > New Git user feel from the carte du jour bar. You can do Git features from either interface interchangeably. Beneath, we provide a side-by-side comparison for publishing your code.
Note
One reward of connecting to a project through Team Explorer is yous proceeds access to the Piece of work Items hub. For an overview of Team Explorer features, see Navigate in Visual Studio Squad Explorer.
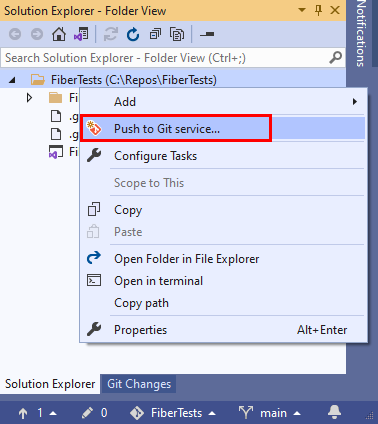
- Connect to an Azure DevOps repo past right-clicking the solution name in Solution Explorer, and and so selecting Push to Git service to launch the Create a Git repository window.
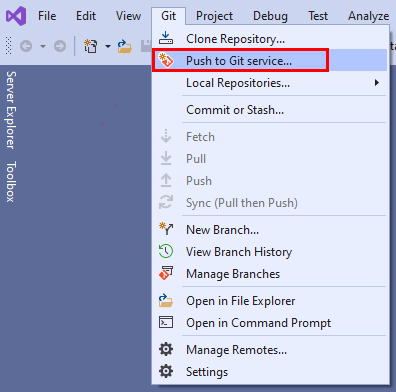
Or, choose Git > Button to Git service from the menu bar to launch the Create a Git repository window.
-
Open a browser and navigate to your Azure DevOps projection past using a URL in the form of
https://dev.azure.com/<OrganizationName>/<ProjectName>. If you don't have a project nonetheless, create ane.
-
In your Azure DevOps project, Create an empty Git repo without a README file. Copy the clone URL from the Clone Repository popup.

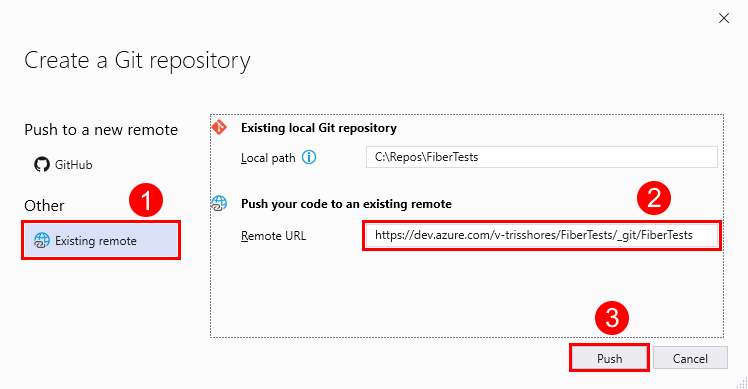
- In the Create a Git repository window, choose Existing remote and enter the repo clone URL from the previous step, and then choose Push. For more information on how to create a new Azure DevOps repo, see Create a new Git repo in your project.
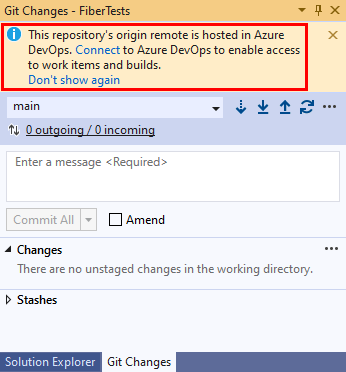
- The Git Changes window shows a confirmation message that your lawmaking is at present in an Azure DevOps repo.
- In the Button to Azure Dev Ops Services department of the Synchronization view in Team Explorer, select the Publish Git Repo button.
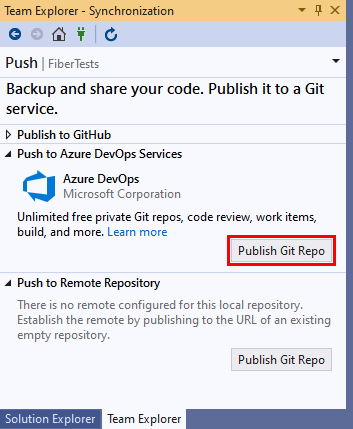
- Choose your Azure DevOps account, organization, and repo name, and and so select Publish Repository.

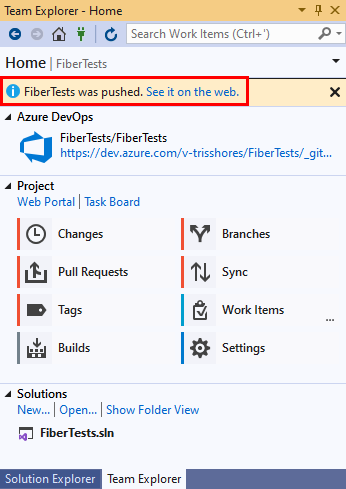
- Your code is now in a Azure Repos Git repository. You can view your code on the web by selecting Come across it on the web.


Review commit changes
It's good practice to review the lawmaking changes in your commit earlier publishing. Visual Studio provides a diff view that helps yous come across all the changes you've made since the previous commit.
- Visual Studio 2019
- Visual Studio 2017
- Visual Studio 2015.ii
- Visual Studio 2013
- Git Command Line
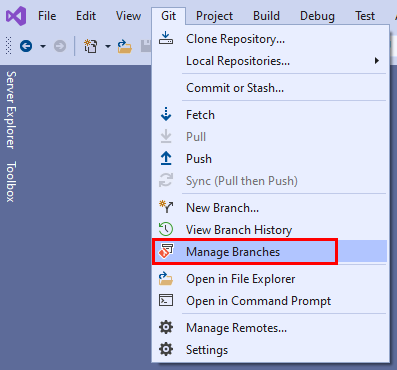
- To see what's changed in a commit, open the Git Repository window by choosing Git > Manage Branches from the menu bar.
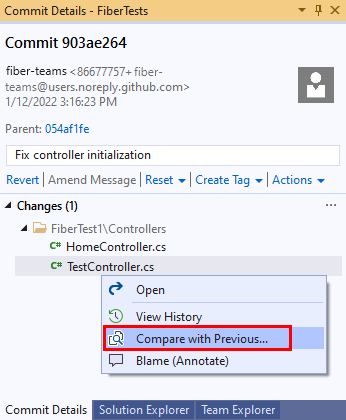
- In the Git Repository window, select your branch, right-click the commit, and and then choose View Commit Details to open the Commit window.
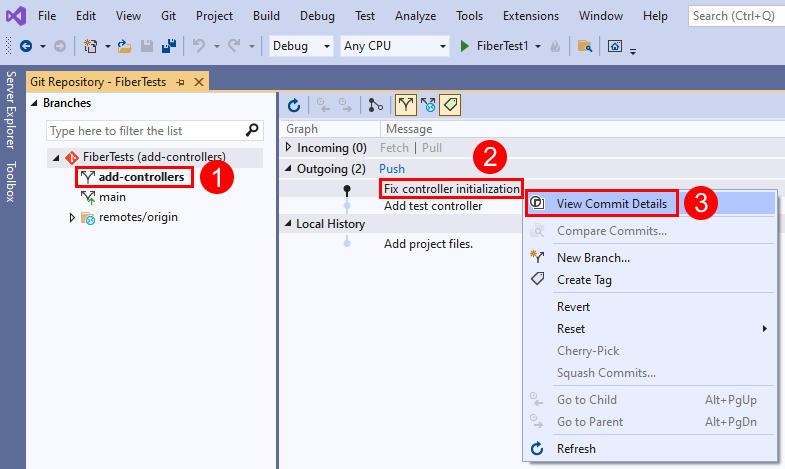
- In the Commit window, you tin right-click on any file and select Compare with Previous to view the file changes made by the commit.

- To see what's changed in a commit, go to the Synchronization page in Team Explorer, right-click on any commit, and and so choose View Commit Details to open the Git Details window.
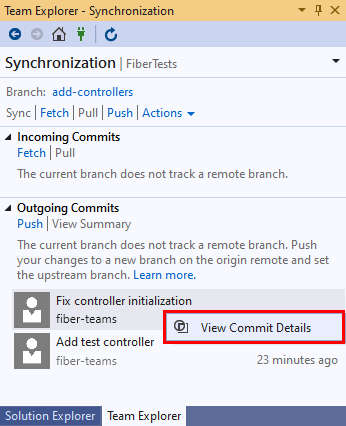
- In the Commit Details window, yous can right-click on whatever file and select Compare with Previous to view the file changes made past the commit.


Link piece of work items to your commits
Every bit you develop your software, you can capture which commits support the completion of work items like Azure DevOps tasks or problems fixes. The audit trail of work items linked to commits lets your squad empathise how tasks and bugs were resolved.
Note
The #ID syntax is supported when you connect to an Azure Repos Git repository. If you connect to a GitHub repository, yous tin can withal link to work items, but must use the #ABID syntax, and have previously set an Azure Boards-GitHub connectedness.
- Visual Studio 2019
- Visual Studio 2017
- Visual Studio 2015.2
- Visual Studio 2013
- Git Command Line
Visual Studio Git
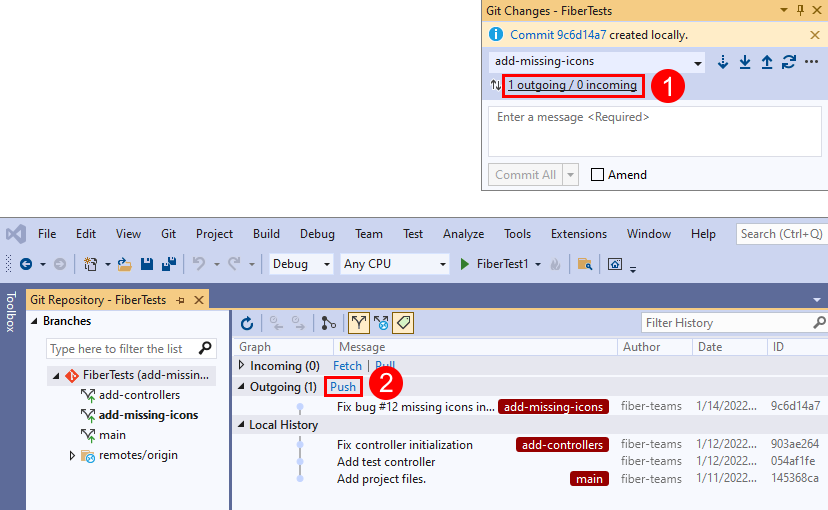
Yous tin link piece of work items to commits by adding #ID into the commit message. For example, the commit message "Fix bug #12 in the reporting tools" would link piece of work detail 12 to the commit when the commit is pushed to Azure Repos.

Visual Studio Team Explorer
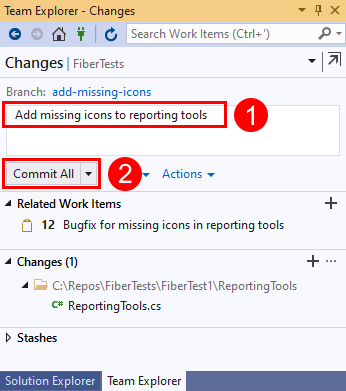
You can include work items in your commits through Related Work Items in the Changes view of Team Explorer.

You tin also link piece of work items to commits past calculation #ID into the commit bulletin. For example, the commit message "Fix issues #12 in the reporting tools" would link work item 12 to the commit when the commit is pushed to Azure Repos.


Button commit changes
- Visual Studio 2019
- Visual Studio 2017
- Visual Studio 2015.2
- Visual Studio 2013
- Git Command Line
Every bit you write your code, your changes are automatically tracked past Visual Studio. When you're satisfied with your changes, you tin can save them in Git using a commit, and then push your commit to Azure Repos.
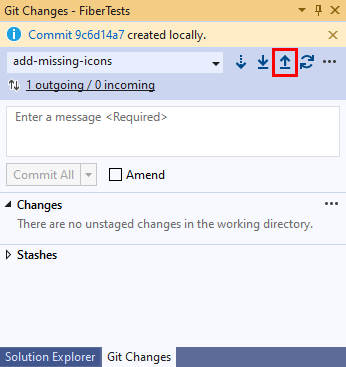
- In the Git Changes window, enter a message that describes the changes, and so cull Commit All. Commit All commits unstaged changes and skips the staging area. You can choose to stage all files before committing by selecting the stage all + (plus) button at the top of the Changes section of the Git Changes window.

- To push your commit to Azure Repos, select the up-arrow push push button.
Or, you lot can button your commit from the Git Repository window. To open the Git Repository window, select the outgoing / incoming link in the Git Changes window.
Or, you lot can choose Git > Push from the carte bar.

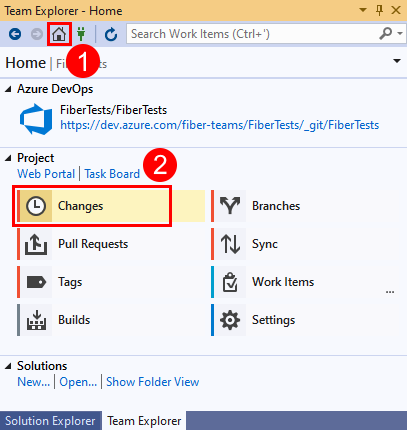
- Open the Changes view of Squad Explorer by selecting the Home button and choosing Changes. Or, select the pending changes icon
 on the status bar.
- In the Git Changes window, enter a bulletin that describes the changes, and then choose Commit All. Commit All commits unstaged changes and skips the staging area. You can choose to stage all files before committing past selecting the stage all + (plus) button at the tiptop of the Changes department in the Git Changes window.
- To push ane or more commits to Azure Repos, select Home then cull Sync to open up the Synchronization view in Team Explorer. Or, select the unpublished changes status bar icon (
 on the status bar.

- In the Synchronization view, choose Push to upload your commit to the remote repo. If this is your first push to the repo, y'all'll come across the message:
The current co-operative does not track a remote co-operative..., which lets you know that your commit was pushed to a new co-operative on the remote repo and that futurity commits pushed from the current branch volition be uploaded to that remote branch.


 ) from the condition bar.
 ) or the Sync view in Squad Explorer. Select Push button to update your lawmaking in Azure DevOps Services/TFS.


Pull changes
- Visual Studio 2019
- Visual Studio 2017
- Visual Studio 2015.two
- Visual Studio 2013
- Git Command Line
You can keep your local branches in sync with their remote counterparts by pulling commits created by others. While you're working on your feature branch, information technology'southward a adept thought to periodically switch to your main branch and pull new commits to keep it electric current with the remote main branch.
Notation
Fetch and Pull links can be found in different views and in the Git bill of fare on the menu bar. Those links all do the aforementioned thing—fetch or pull from the remote repo to the current branch of the local repo.
- In the Git Changes window, y'all can check for the latest commits on the remote co-operative by using the down-arrow fetch link, then selecting the approachable / incoming link to open up the Git Repository window. Fetch downloads remote commits that aren't in your local branch, only won't merge them into your local branch. Fetched commits show upwards in the Incoming Commits section of the Git Repository window. You can double-click a fetched commit to view its file changes.

- Cull Pull to merge the fetched remote commits into your local repo. Pull performs a fetch and so merges the downloaded commits into your local branch.
- In Team Explorer, select Dwelling house and choose Sync to open the Synchronization view.
- In the Synchronization view, yous can preview the latest changes on the remote branch by using the Fetch link. Fetch downloads remote commits that aren't in your local branch, but doesn't merge them. Fetched commits show up in the Incoming Commits section of the Synchronization view. Yous tin can double-click a commit to view its file changes.
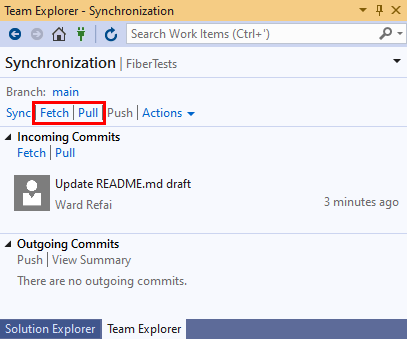
- Cull Pull to merge the fetched remote commits into your local repo. Pull performs a fetch and then merges the downloaded commits into your local branch.


FAQs
Q: Why does the sign-in page differ between the spider web portal and Visual Studio?
A: Your sign-in page depends on whether you lot used a Microsoft account or a work business relationship with Azure DevOps. Always sign in with the username and password that you lot apply for Azure DevOps.
Q: Can I use the Git command prompt with Visual Studio?
A: Visual Studio's Team Explorer and the Git control-line work dandy together. Changes to your repos made in either tool will be reflected in the other. Make sure to install the latest release of Git for Windows, which has tools to help y'all connect to your Azure DevOps Services/TFS repos.
See the Azure Repos Git tutorial and the command reference for additional help using Git from the command line.
Next steps
Related articles
- New to Git repos? Learn more
Feedback
Source: https://docs.microsoft.com/en-us/azure/devops/repos/git/share-your-code-in-git-vs
Post a Comment for "Visual Studio Online Can't Push From Visual Studio Could Not Read Username"